Currently I am working on a series of Spirit Animals and have just completed my third—the slug. Yes, it’s true, I consider the slug to be one of my spirit animals. But come on! It’s slow, in no way glamorous, yet it accomplishes all that it sets out to do. It’s a great representation of playing the long game. But that’s besides the point.
What I will be going over here is not an A to Z process of how I created this illustration but a few techniques from the process that I think could be benefitted from. I’ll be going over:
- making the most of live corners in Illustrator CC
- exporting from Illustrator to Photoshop
- tips for working with textures in Photoshop
If none of that interests you, there’s really no need to stick around. However, if it does, let’s get started!
Live Corners in Illustrator CC
If you’re using Adobe Illustrator CC then surely you’ve used these. They’re the little circular widgets that appear on the corners of rectangles and other sorts of shapes. Simply, dragging them towards and away from the corner will give varying degrees of roundness to it—something that was quite a pain in earlier versions of Illustrator.
Where I believe their true potential lies is not in rounding the corners of boxes but in creating complex and organic looking shapes—such as these floating blobs:

In most cases, you would need to use the pen tool and draw out these curves. It’s not terribly hard but depending on the shape and your skill with the pen tool it can be a lot more time consuming than it needs to be. What I have learned is that by using the live corners I can considerably speed up my process and create smoother looking curves. Because let’s face it, the software is much better at creating curves than I am.

Using sharp corners is a lot quicker than drawing out precise curves
Rather than drawing out the curves of the shapes I am just using sharp corners. Then, I revisit each corner by dragging out the corner widgets and letting Illustrator give me the smooth curve I’m after. And, because they’re live, I can continue to adjust them all I want!

Live corners means the freedom to manipulate the curves over and over again
If you want to learn more about this technique I go over it and several others in my course on Giving the Pen Tool a Day Off.
Exporting layered Illustrator files into Photoshop
If you’re going to be bringing your illustration into Photoshop there is a lot of reason to have it split up into layers. And the good news is, it isn’t terribly hard.
First up you’ll need to set up your Illustrator document accordingly. Really, all that goes into that is putting everything you will want on a layer in Photoshop on it’s own layer in Illustrator. Here is how I structured my file:
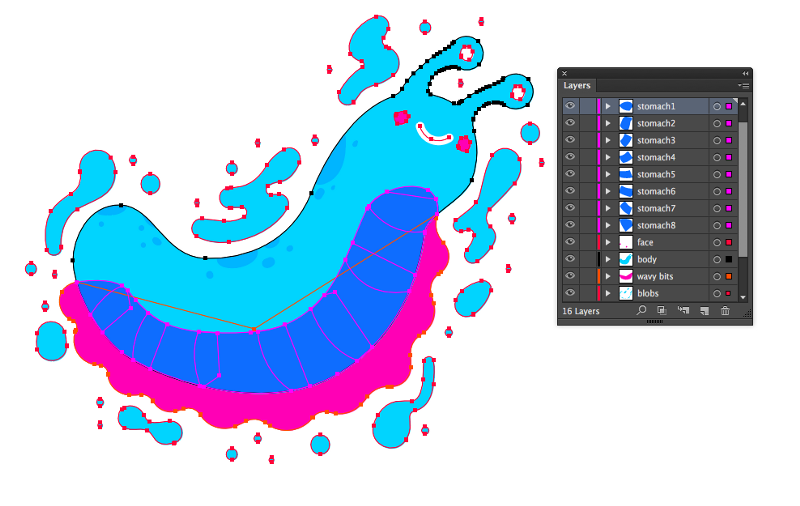
With layer names like ‘wavy bits’ it’s clear that my mollusk anatomy is on point
You’ll notice that I have eight layers for the stomach (yes, I know it’s not called a slug stomach). I have sectioned that part of the illustration into eight panels because of how I want to texture it. I’ll be going over that in the next section.
Once you’ve set your Illustrator file up, exporting as a layered Photoshop file is as a simple as going to File>Export and setting the format to psd. All you need to do from here is set the resolution and colour model to what you want and check the box to write layers. I typically stick with Maximum Editability as well.
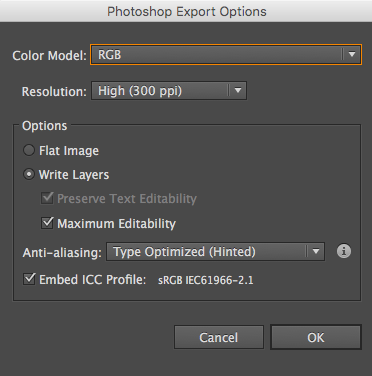
As I’ll ultimately be printing these illustrations, I’m working with a high resolution. 72 ppi is just fine if you’re sticking with screen display
Working with textures in Photoshop
Before we get into applying textures, we’ll need to set them up. With this piece, I knew that I wanted the textures to be solid white so that they could be used to knock out texture from the flat-colour illustration. This means that I needed textures that were solid black/white. I‘ve chosen to use this beautiful texture pack ($15) and have not looked back. But if you’re interested in making textures of your own there are countless tutorials out there for it—it’s just a quick Google away.
To get your textures to work in the way I am using mine you’ll need to do the following:
- make sure they are solid black/white (no transparency)
- subtract all of the white so that only the black remains (the Mixed Grit texture pack provides a Photoshop action for this)
- use a colour overlay to make the remaining pixels white (this is of course if your background is white)
- save it as a greyscale bitmap tiff
Because it is hard to show otherwise, I’ve added a black background so that you can see the white texture in this file. In the actual file, this black layer wouldn’t be present:
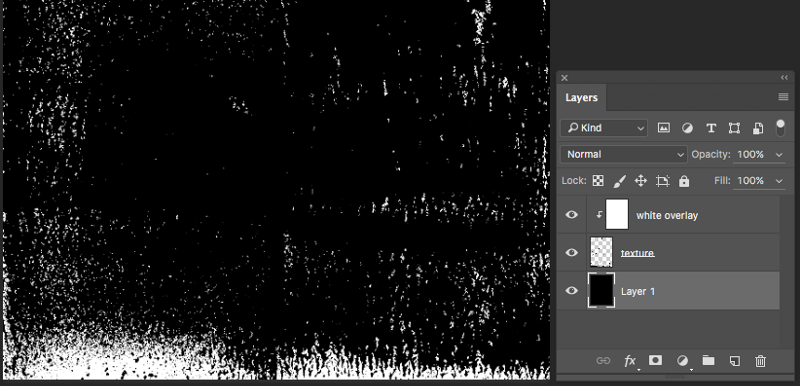
The TIFF file is really only comprised of the texture on a transparent background with a white overlay clipped to it
Once your textures are set up it’s time for the fun bit—applying it! The process from here on out is:
- Place the texture file into your document
- Place the texture above the layer you wish to apply it to
- Hold Option (ALT on a PC) and click between the two layers to create a clipping mask
- Move the texture layer around to get the look you’re after
- If there are any pieces of the texture you’d like to mask out, add a layer mask to it and use the brush to hide what you don’t want
I am dragging the texture layer on top of the layer I want it applied to then holding OPT and clicking to make it a clipping mask

Once the texture is clipped onto the layer I can move it into the place I want it
Finally I am adding a layer mask to the texture layer, inversing it so all is hidden and then using a white brush to make only the texture that I want visible
Lastly, because it’s worth showing, this is why I had eight different stomach layers. I wanted to texture it in such a way that you could see the clear distinction between the panels of the stomach. Giving each panel it’s own layer made it very easy.

Because each panel is an individual layer, when I add the texture as a clipping mask it cuts off exactly where I want it
Conclusion
My hope is that by covering these three topics I was able to demystify some of the work that goes into making textured pieces such as this. And if some of it is still shrouded in mystery, do let me know!
I’d love to hear what you think of this format. All in all, I’m looking for the best ways to help out my fellow illustrators and designers. If you think I should do more of these, I will do more of these. If they’re a waste of time, I’ll find something else 😉
Finally, if you dig the project, you can follow the progress over on Dribbble, Twitter or Instagram. And if you got a lot out of this, all I ask is that you share it with others so that it can reach more eyeballs 🙂
All the best!
Hayden Aube
Happy Faces on Everything
Happy Faces on Everything began in 2016 when I realized I could make the journey for designers and illustrators easier. Rather than just add to the noise that's out there, I filter through it and distill only what's necessary. By focusing on quality over quantity, you can have confidence in knowing that every course, tutorial and resource you find on the site is attentively researched and heavily curated.